Showing posts with label DIY / Fes-t'ho tu mateix. Show all posts

Apr 24, 2014

DVD case upcycled / Caràtula de DVD reciclada


Aitana loves drawing and colouring. When she experiences something which she doesn't know very much how to handle (either something good or bad), she needs to draw about it. At other times, she needs to act it out, over and over again.
A Aitana li encanta dibuixar i pintar. Quan experimenta alguna cosa que no sap massa bé com gestionar (ja siga una cosa bona o dolenta), necessita dibuixar-ho. En altres ocasions, necessita actuar, representar-ho, una i altra vegada.
 
 That's why we always carry with us some papers and colour pencils... until I found this idea on Pinterest: how to turn a DVD case into a colouring case. It wasn't very difficult to do, and Aitana really liked it. Furthermore, it is an excellent travel toy.
És per això que sempre portem amb nosaltres alguns papers i llapis de colors ... fins que vaig trobar aquesta idea a Pinterest: com convertir una caixa de DVD en una caixa de color. No va ser molt difícil de fer, i a Aitana liva agradar molt. A més, és perfecta com a joguina de viatge.

As soon as I gave it to her, she made this drawing and gave it to me as a present. I love the curly lines on top of the page and how the whole drawing seems to have movement.
And as for Martí, he (just) enjoys dragging things.
Tan prompte com li la vaig donar, em va fer aquest dibuix. M'encanten les línies curves a la part superior de la pàgina i com tot el dibuix sembla tenir moviment.
I pel que fa a Martí, (senzillament) li agrada arrossegar coses.


Thanks for your comments
Gràcies pels vostres comentaris

Mar 30, 2014

Aitana's Brave party / Festa d'aniversari de Brave

Decoration


Ja, ja se que fa més de mig any des de l'aniversari d'Aitana, però volia compartir aquesta entrada. M'encanta preparar secretament la seua festa d'aniversari, la decoració, les activitats per als xiquets i xiquetes, la cucanya, etc.
 

Decorate your crown
Enguany, continuem amb la febra princessil, així que la festa va estar dedicada a la seua heroïna d'aleshores: Mèrida (ara destronada per les protagonistes de Frozen). Ho vam passar d'allò més bé. Els xiquets i xiquetes van jugar a llançar els haggis, van decorar les seus corones i es van fer polseres, cadascú quan va voler fer-ho, al seu ritme.


Do your own bracelet
Busy hands
La cucanya era una caixa amb forats que els xiquets trencaven amb el puny. Dins, hi havien llepolies. Com a detallet d'agraïment, vaig fer unes diademes de Mèrida per a les xiquetes i un estoig de tela amb retoladors de tela per a decorar-lo per als xics. Com moltes altres vegades, la meua inspiració va ser Pinterest.


Toss the haggies / Llança els haggies

Yes, I know that it's been more than half a year since we celebrated Aitana's birthday, but I wanted to share it with you. I love secretly preparing everything for her party, the decoration, the activities for the children, the treats, the pinata, etc.
 
This year, since we're still having a crush for princesses and everything about them, the party theme was Aitana's then favourite heroine, Merida (who has now been overthrown by Frozen's main female characters). We had a really good time. The children played at their own path and when they wanted to. They tossed some haggis, decorated their crowns and made a bracelet. The pinata was actually a box with holes in it big enough for the children to break them with their fists. Inside, there were some swets. As a party treat, I made some head bands for the girls and a fabric pencil case with fabric felt pens to decorate it, for the boys. As in some other occasions, my inspiration came mainly from Pinterest.
The pinata / La cucanya


Party treat / Detallet


Party treat / Detallet


Gràcies per vindre / Thank you for coming 


Throwing a party is exhausting
Celebrar una festa és esgotador 


Thanks for your comments
Gràcies pels vostres comentaris

Apr 14, 2013

DIY dolls' house (part 3) / Casa de nines feta a mà (tercera part)

This is the last post about our dolls' house (unless we manage to finish our garden / backyard). After showing you the bedroom and living room, and the kitchen; you'll now see the bathroom.

Aquest és l'últim post sobre la nostra casa de nines (llevat que aconseguim acabar el nostre jardí / pati de darrere). Després de mostrar el dormitori i sala d'estar, i la cuina, ara veureu el bany.
 

The sink is made with a paper clip and a contact lenses empty kit. The mirror frame is part of the plastic opening of a baby wipes package and a CD was used for the mirror itself. Tape has been one of my best allies in creating some of the furniture, as in the case of the toilet, made of egg carton. For the showerhead, I used the cap from a milk brick.


El lavabo està fet amb un clip i un kit de lents de contacte buit. El marc de l'espill és part de la tapa de plàstic d'un paquet de tovalloletes de bebè i vaig usar un CD per a fer l'espill. La cinta aïllant ha sigut una de les meues millors aliades en la creació d'alguns dels mobles, com en el cas del vàter, fabricat amb cartró d'ous. Per a la dutxa, he utilitzat el tapó d'un brick de llet.


The thing I like most about the house is the fact that I have finally used some of the items I usually keep just in case I need them (TP rolls, egg cartons, rubber bands, bottle caps, etc.). Who knows? They can become art someday. And.. last but not least, my husband has finally acknowledged that they are not exactly trash and that I am not developing a Diogenes syndrome ;) 

El que més m'agrada de la casa és que per fi he utilitzat algunes de les coses que guarde per si em fan falta alguna vegada (rotllos de paper de vàter, caixes d'ous, gomes, taps de botelles, etc.) Qui sap? Poden arribar a convertir-se algun dia en art. I. .. per últim, però no menys important, el meu marit ha reconegut finalment que no són exactament les trastos i que no estic desenvolupant una síndrome de Diògenes ;)

I'm sharing this project at madebyjoey

Thanks for your comments
Gràcies pels vostres comentaris

Apr 4, 2013

DIY dolls' house (part 2) / Casa de nines feta a mà (segona part)

Here is another of the rooms in our dolls' house. Aitana and I love playing with them. We have made some peg dolls to fit in the furniture and we're now making a garden/backyard.

Aci està una altra de les habitacions de la nostra casa de nines. A Aitana i a mi ens encanta jugar amb elles. Hem fet unes nines amb una mida adequada per als mobles i ara estem fent un jardí / pati

This is our kitchen. A modest one, no microwave, no oven.

Aquesta és la nostra cuina. Modesta, sense microones, sense forn.

Here is a detail of the sink, made with a paper clip and a contact lenses empty kit. The cooker is made of velcro glued to the counter (cork from an old board)

Aci teniu un detall de la pica, feta amb un clip i un estoig de lents de contacte buit. El foguer està fet de velcro enganxat al banc (suro tauler vell)

The table is made of the top of a yoghurt pot and some bottle cap joined with tape. I used blu-tack to stick the leg to the table. The chairs are made with pieces an egg carton box. I sewed some cushions matching the fabric in the rest of the kitchen (very Italian-like, by the way).

La taula està feta amb la tapa d'un pot de iogurt i alguns taps de botella que vaig unir amb cinta adhesiva. Vaig utilitzar blu-tack per enganxar la pota a la taula. Les cadires estan fetes amb cartró d'una caixa d'ous. Vaig cosir uns coixins a joc amb la tela de la resta de la cuina (d'estil molt italià, per cert).

For the fridge, I used the plastic opening of a baby wipes package. I printed the inside and the outside of it and glued them. It was quite difficult to find the perfect picture size to match the fridge door, especially because I wanted to be a vintage one.

A la nevera, vaig utilitzar la tapa d'un paquet de tovalloletes de bebè. Vaig imprimir l'interior i l'exterior de la nevera i les vaig pegar. Va ser prou difícil trobar la mida de la imatge perfecta perquè coincidira amb la porta de la nevera, sobretot perquè jo volia que fora d'estil vintage.

Coming soon... the bathroom.
Pròximament... el bany.

Proud to appear at a former classmate's blog: madebyjoey: sharing creative ideas {all weekend}

Thanks for your comments
Gràcies pels vostres comentaris

Mar 27, 2013

DIY dolls' house (part 1) / Casa de nines feta a mà (primera part)

I was once told that when you are pregnant and start tidying compulsively your house, you're kind of preparing your nest because the baby is about to be born. It was not my case. I mean, I didn't start cleaning as if I were mad, but I started doing houses. Apart from the tablecloth house I sewed for Aitana, I also this this:


Una vegada em van dir que quan estàs embarassada i te pega per ordenar i netejar la casa de manera compulsiva, és que estàs preparant el niu i vol dir que el part està prop. Eixe no va ser el meu cas. Vull dir, que no em vaig posar a netejar com una boja, però sí a fer cases. A banda de la casa-mantell que vaig cosir per a Aitana, també vaig fer açò:


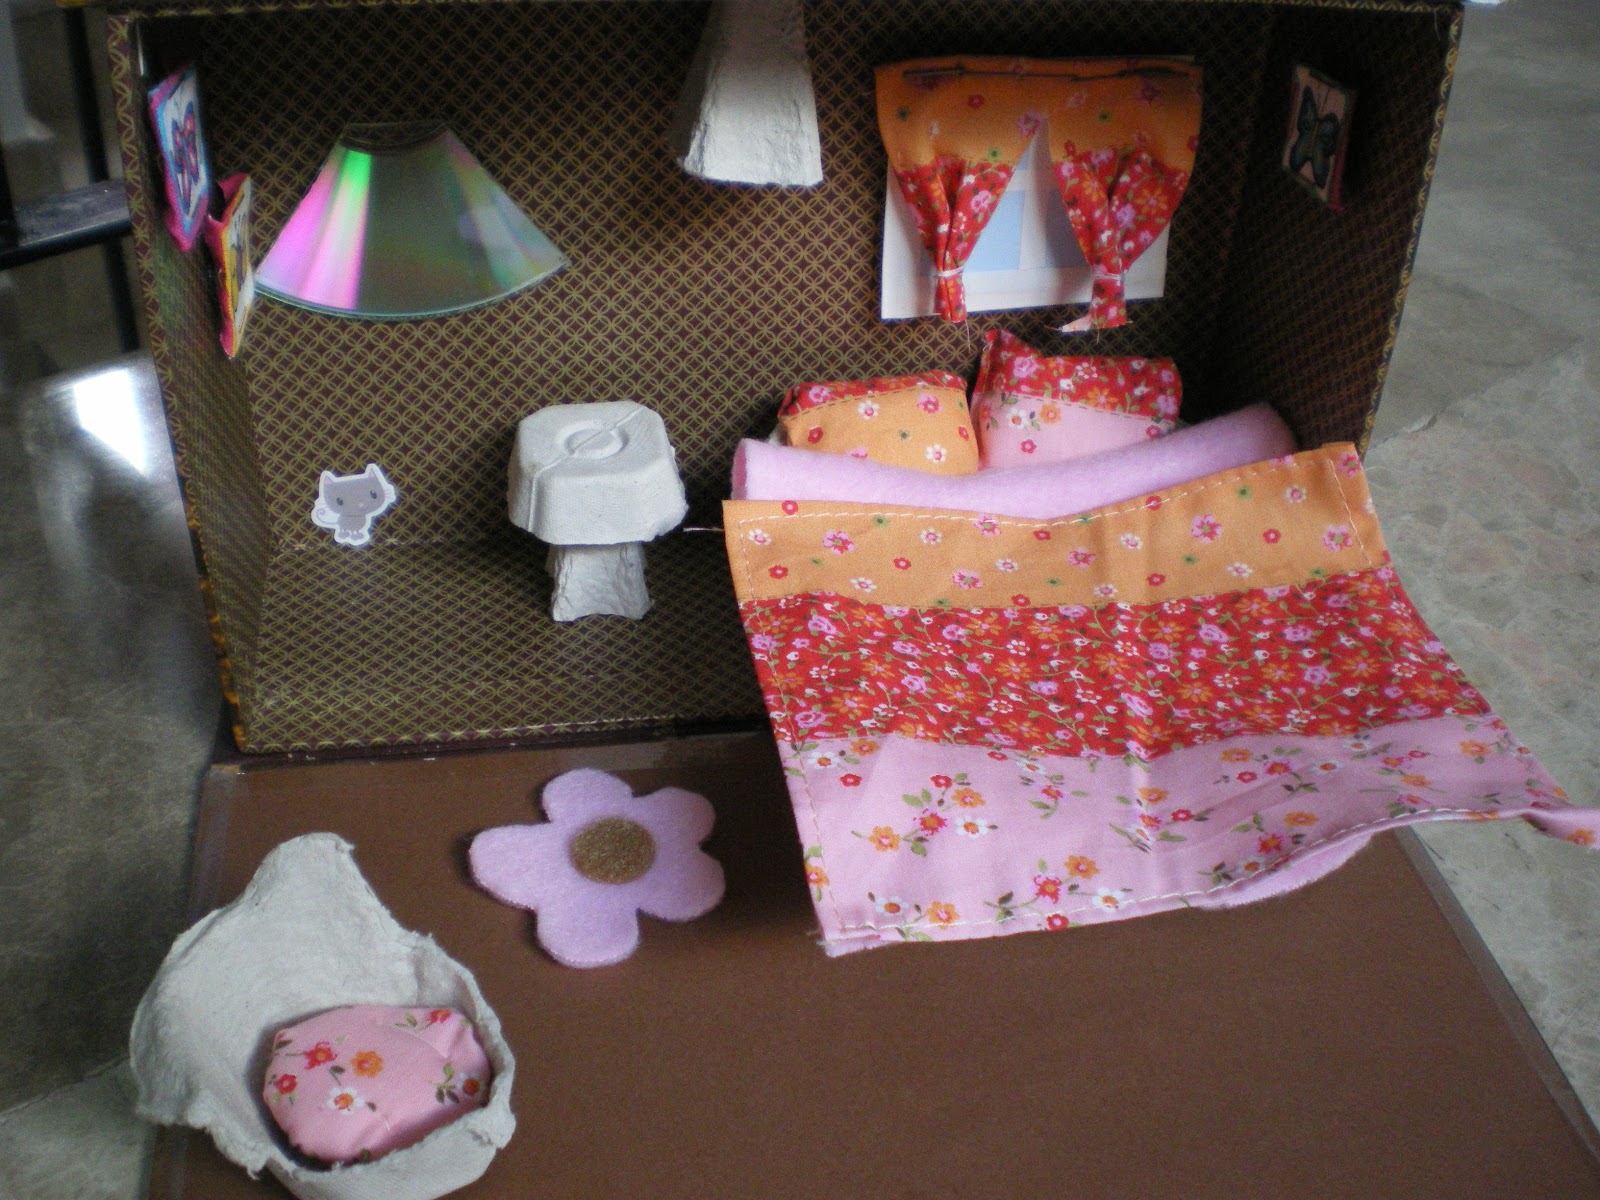
I saw this box and I was suddenly inspired. I decorated it with stickers and paper as you can see in the first images above. I had a pile of recycled items such as egg cartons, old CDs, old T-shirts, plastic caps, etc. and I started to turn them into furniture for the little dolls' house.
Vaig veure aquesta casa i em va vindre la inspiració. La vaig decorar amb enganxines i paper i va quedar conforme la vegeu a les imatges de dalt del tot. Tenia una muntonada de coses reciclades com ara caixes d'ous, CDs, Samarretes velles, taps de plàstic, etc. i vaig començar a convertir-los en mobles per a la casa de nines.
My best allies have been glue, staples, tape and velcro. I've also sewn some things, too.
Els meus millors aliats han sigut el pegament, grapes i velcro, encara que també he cosit algunes coses.

This is the bedroom. The bed, bedside table, lamp and armchair are made with egg cartons. The drawings are pieces of cloth stapled to paper. The mirror is a piece of a CD. Everything is stuck to the "walls" with velcro.

Aquest és el dormitori. El llit, la tauleta de nit, el llum i la butaca estan fetes amb cartrons d'ous. Els dibuixos són peces de roba grapades a un tros de cartolina. L'espill és un tros de CD. Tot s'enganxa a les "parets" amb velcro.


Next came the dining / living-room.Després va vindre el menjador / sala d'estar.


Again, egg cartons are the material I used most (for the sofa, lamps, and chairs). I made the rug by glueing a piece of yarn into cardboard paper. Una vegada més, els cartrons d'ous van ser el material que més vaig utilitzar (per al sofà, llums i cadires). Vaig fer l'estoreta pegant un tros de llana en cartolina.

I cut the drawing from a decoration magazine and laminated it. El quadre el vaig retallar d'una revista de decoració i el vaig plastificar.
The table is part of a plastic box stuck to a reel.
 La taula és part d'una caixa de plàstic enganxada a un rodet.

 
Have you noticed the library? It's one of those boxes you get at the jeweller's. It contained a necklace. When you open it, it becomes a TV. With differents "screens" to choose.
Us heu fixat en la llibreria? És una d'aquelles caixes que te donen a la joieria. Esta era d'un collar.  En obrir-la, es converteix en un televisor. Amb diferents "pantalles" per triar.


Proud to appear at a former classmate's blog: madebyjoey: sharing creative ideas {all weekend}


Thanks for your comments
Gràcies pels vostres comentaris

Mar 23, 2013

I'm sharing .../ Compartint ...

Have a look at this blog in which creative people from all over the blogosphere share their ideas. By the way, I'm number 6.

Pegueu una miradeta a aquest blog on gent creativa de tota la blogosphera comparteix les seues idees. Per cert, jo sóc la número 6.

Thanks for your comments
Gràcies pels vostres comentaris

Mar 20, 2013

Tablecoth house / Casa-mantell


Aitana loves her letterbox / A Aitana li encanta la seua bústia
I'm still keeping up with posts I wanted to write and I didn't have much time to. This is the tablecloth house I made for Aitana as a Christmas present. I spent some nights sewing against the clock after Aitana went to sleep in order to have it ready before Martí was born. In spite of what it might seem, it wasn't that hard to do, really. But, on the other hand, since I usually get trapped in the "want-to-do-it" instead of getting into action, I'm glad I managed to do it in the end!!
As in many other projects, my inspiration came from Pinterest.


Encara estic escrivint entrades atrasades, que volia haver escrit fa un temps. Aquesta és una casa-mantell que vaig cosir per a Aitana. Va ser el seu regal del Pare Noel. Vaig passar unes quantes nits cosint a contrarellotge durant un parell d'horetes després de que Aitana es dormira. Volia tindre'l preparat abans de que nasquera Martí. Encara que parega molta faena, no va ser tan dur, de veres. De totes formes, estic molt contenta d'haver sigut capaç d'aconseguir-ho perquè, sovint, me quede en el plànol de "m'agradaria fer açò o allò" i mai passe a l'acció. Aquesta vegada vaig proposar-m'ho i ho vaig començar i acabar!!

Com en tants altres projectes, la meua inspiració va vindre de Pinterest.

 
WELCOME IN
 
 
Thanks for your comments
Gràcies pels vostres comentaris

Feb 8, 2012

Our homemade plasticine (play dough) / Recepta per a fer plastilina


A Aitana li encanta la plastilina i, de fet, a mi també! M'encanta el tacte que té, m'agrada esprémer-la a les mans, i m'encanta el fet que es pot fer a casa amb productes naturals. Ací està la meua recepta:

 
-200 ml d'aigua
-200 ml de farina de blat (és millor tamisar-la)
-100 ml de sal
-3 cullerades d'oli
-1 cullerada de cremor tàrtar (també es pot utilitzar bicarbonat. Veure aquest
bloc.)
-5 (més o menys) gotes de glicerina
-Colorant per a aliments. (També es pot utilitzar colors trets d’ingredients naturals. Veure
ací)

No he provat el bicarbonat (no sé si és tan bon conservant com el cremor tàrtar). Però et puc dir que aquesta plastilina dura setmanes (i fins i tot mesos!) si es guarda a la nevera.

Aitana loves plasticine and, in fact, I also do!! I love the touch it has, I like to squeeze it in my hands, and I love the fact that you can easily do it at home with natural products. Here is my recipe:
-200 ml of water
-200 ml of plain flour (it will help if you sieve it)
-100 ml of salt
-3 tablespoons of oil
-1 tablespoon of Cream of Tartar (you can use bicarbonate instead. See this blog.)
-5 (or so) drops of glycerine
-Food colouring. (You can also use natural colours out of natural ingredients. See here)

I haven't tried the bicarbonate (I don't know if it is as good preservative as the Cream of Tartar). But I can tell you that this playdough lasts for weeks (even months!!) if stored in the fridge.


Thanks for your comments
Gràcies pels vostres comentaris